Technical Ads Details
This page covers everything you need to know to prepare an ad for Paged Out! on the technical side - which file formats we accept, the exact sizes, and which parts of the page to keep free of important content. If you don't have a designer - no problem! Our designers can create an ad for you. Just let us know at ads@pagedout.institute.
Ad file formats
We accept ads as PDF (recommended) or PNG files.
PDF (recommended) - the only format in which links in your ad can be clickable.
- Page size: exactly the size of your ad (for full-page ads, including the bleed) - see half-page ads or full-page ads below.
- No printer's marks: export without crop marks (also called trim marks), bleed marks, registration marks, color bars, or page information - in many design tools they're in the "Marks and Bleeds" part of the PDF export settings. Do keep the bleed itself for full-page ads, though. What are printer's marks?
- Colors: RGB, not CMYK - most readers will see your ad on a screen.
- Text: keep text as text - please don't convert it to curves or outlines (unless that's intended, e.g. in a logo).
- Images: if your ad contains bitmaps (photos, screenshots, etc.), use 300 DPI and lossless or high-quality compression.
- Links: make them clickable (link annotations) and keep them simple - no JavaScript or other embedded scripts. It's also a good idea to add a QR code or the address as visible text, in case your ad ends up printed.
- Loading speed: the PDF should open quickly. Check it in a couple of PDF viewers (e.g. your web browser and a desktop PDF reader) - if it's slow, merging complex vector layers or turning parts of the design into a bitmap usually helps.
PNG
- Size: exactly the pixel size of your ad at 300 DPI - see the tables below.
- Colors: RGB.
- Links: a PNG can't have clickable links, so add a QR code or the address as visible text instead.
Half-page ads
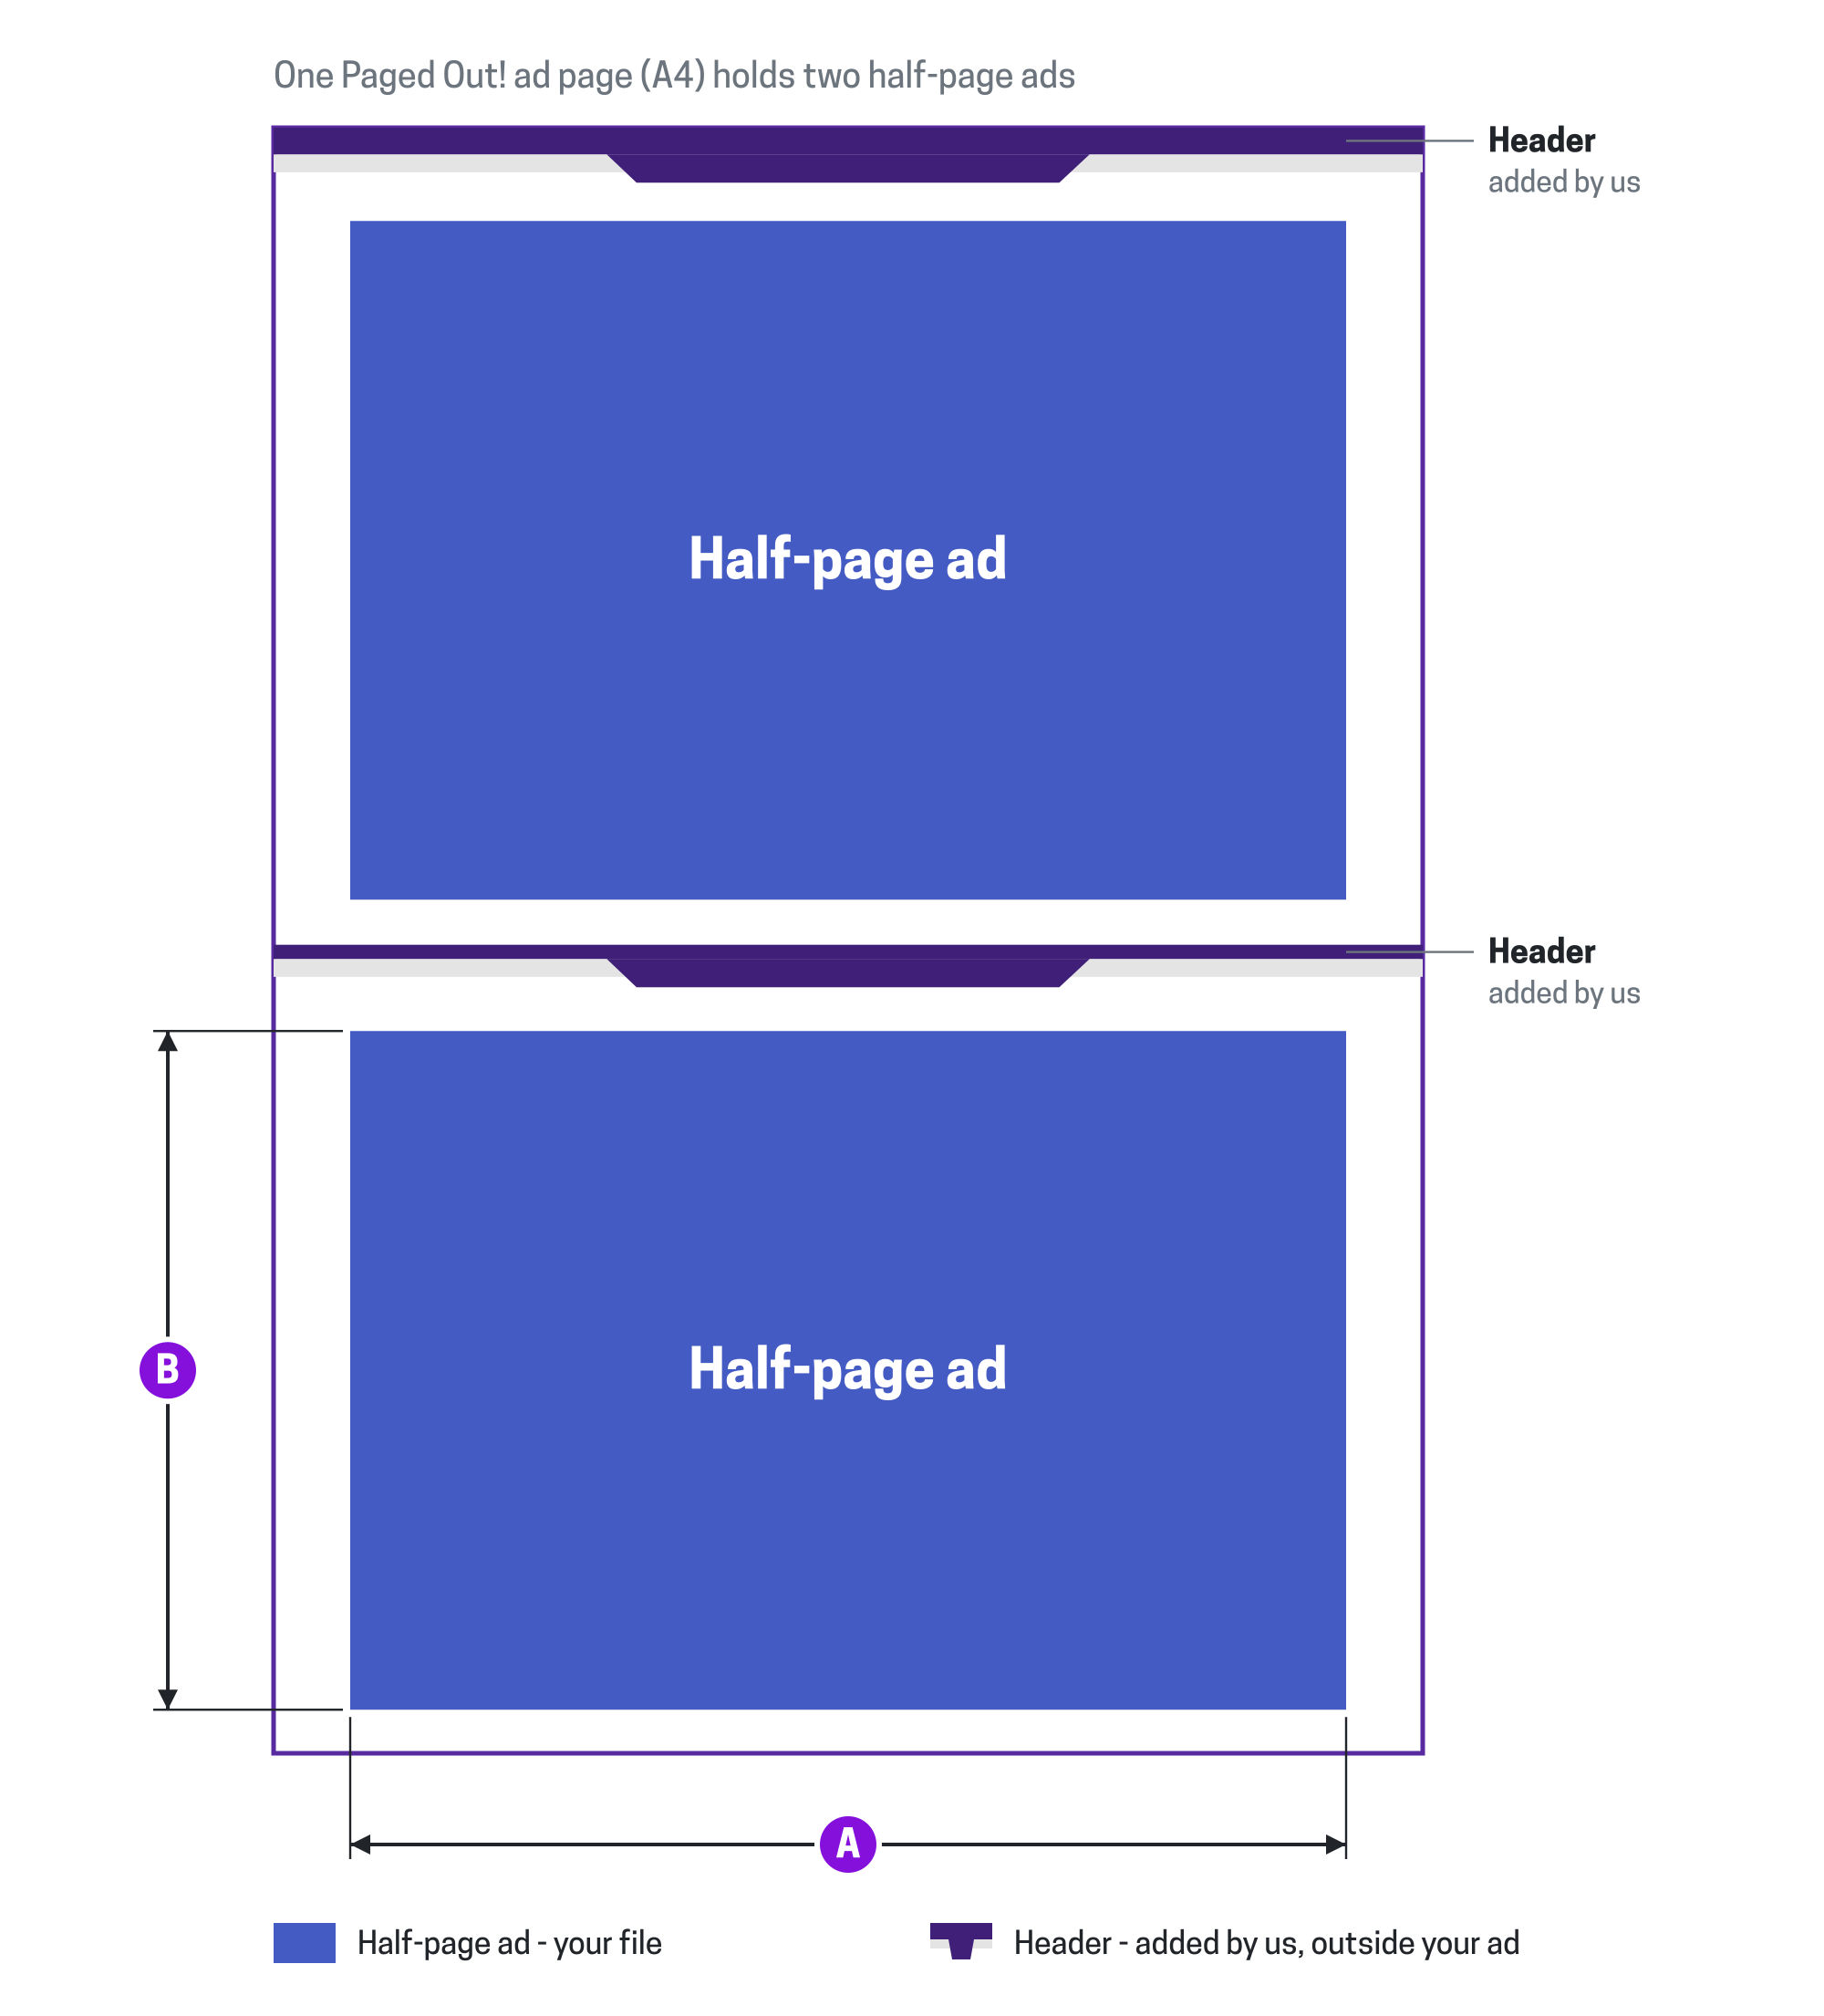
Half-page ads are used for Community Ads and half-page Sponsorship Ads. Each page holds two of them, and we add a header above each ad - outside of it, so it doesn't cover anything.
A half-page ad doesn't reach the edges of the paper, so it doesn't need a bleed or safe margins - you can use the whole area for your design.
Click to enlarge
| What | mm | inches | points | pixels (300 DPI) |
Remarks | |
|---|---|---|---|---|---|---|
| A | Ad width | 182 | 7.17 | 515.91 | 2150 | The width of your file (PDF page or PNG image). |
| B | Ad height | 124 | 4.88 | 351.50 | 1465 | The height of your file. A half-page ad is a bit smaller than half of an A4 page, as the page also holds the two headers. |
Full-page ads
Full-page ads are used for full-page Sponsorship Ads. A full-page ad covers the whole page - all the way to the edges of the paper - so when preparing it, please keep in mind the following:
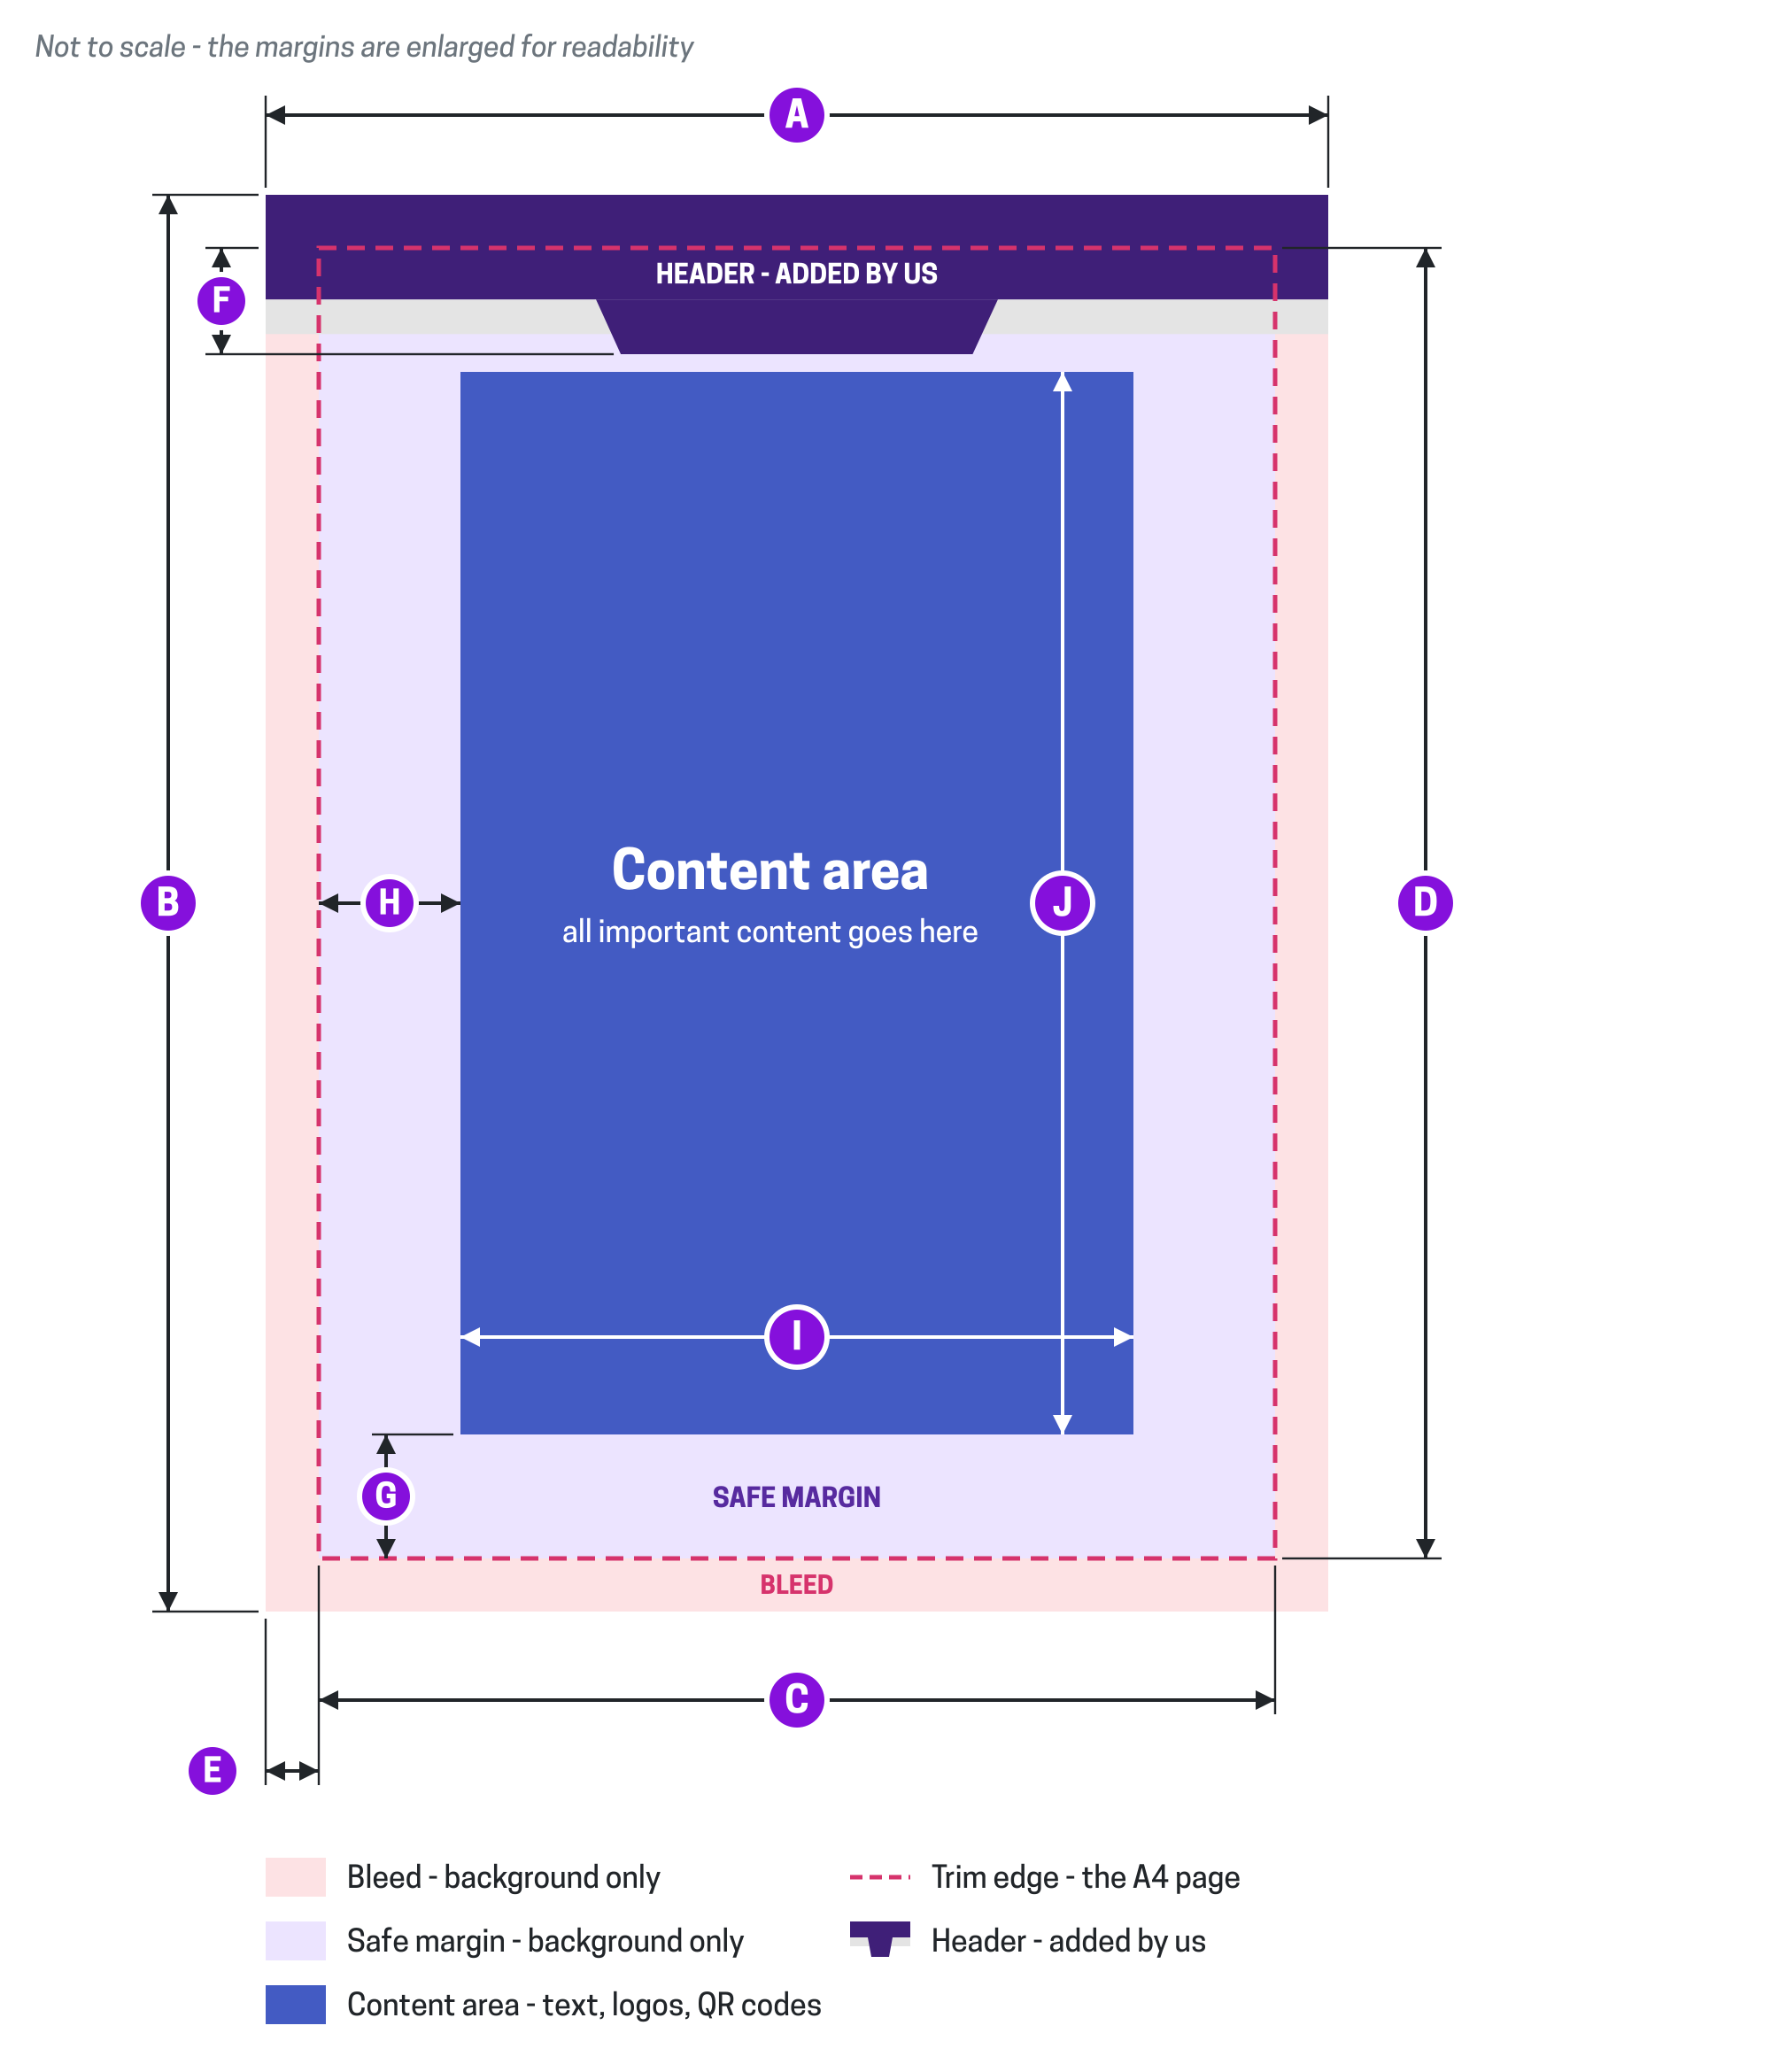
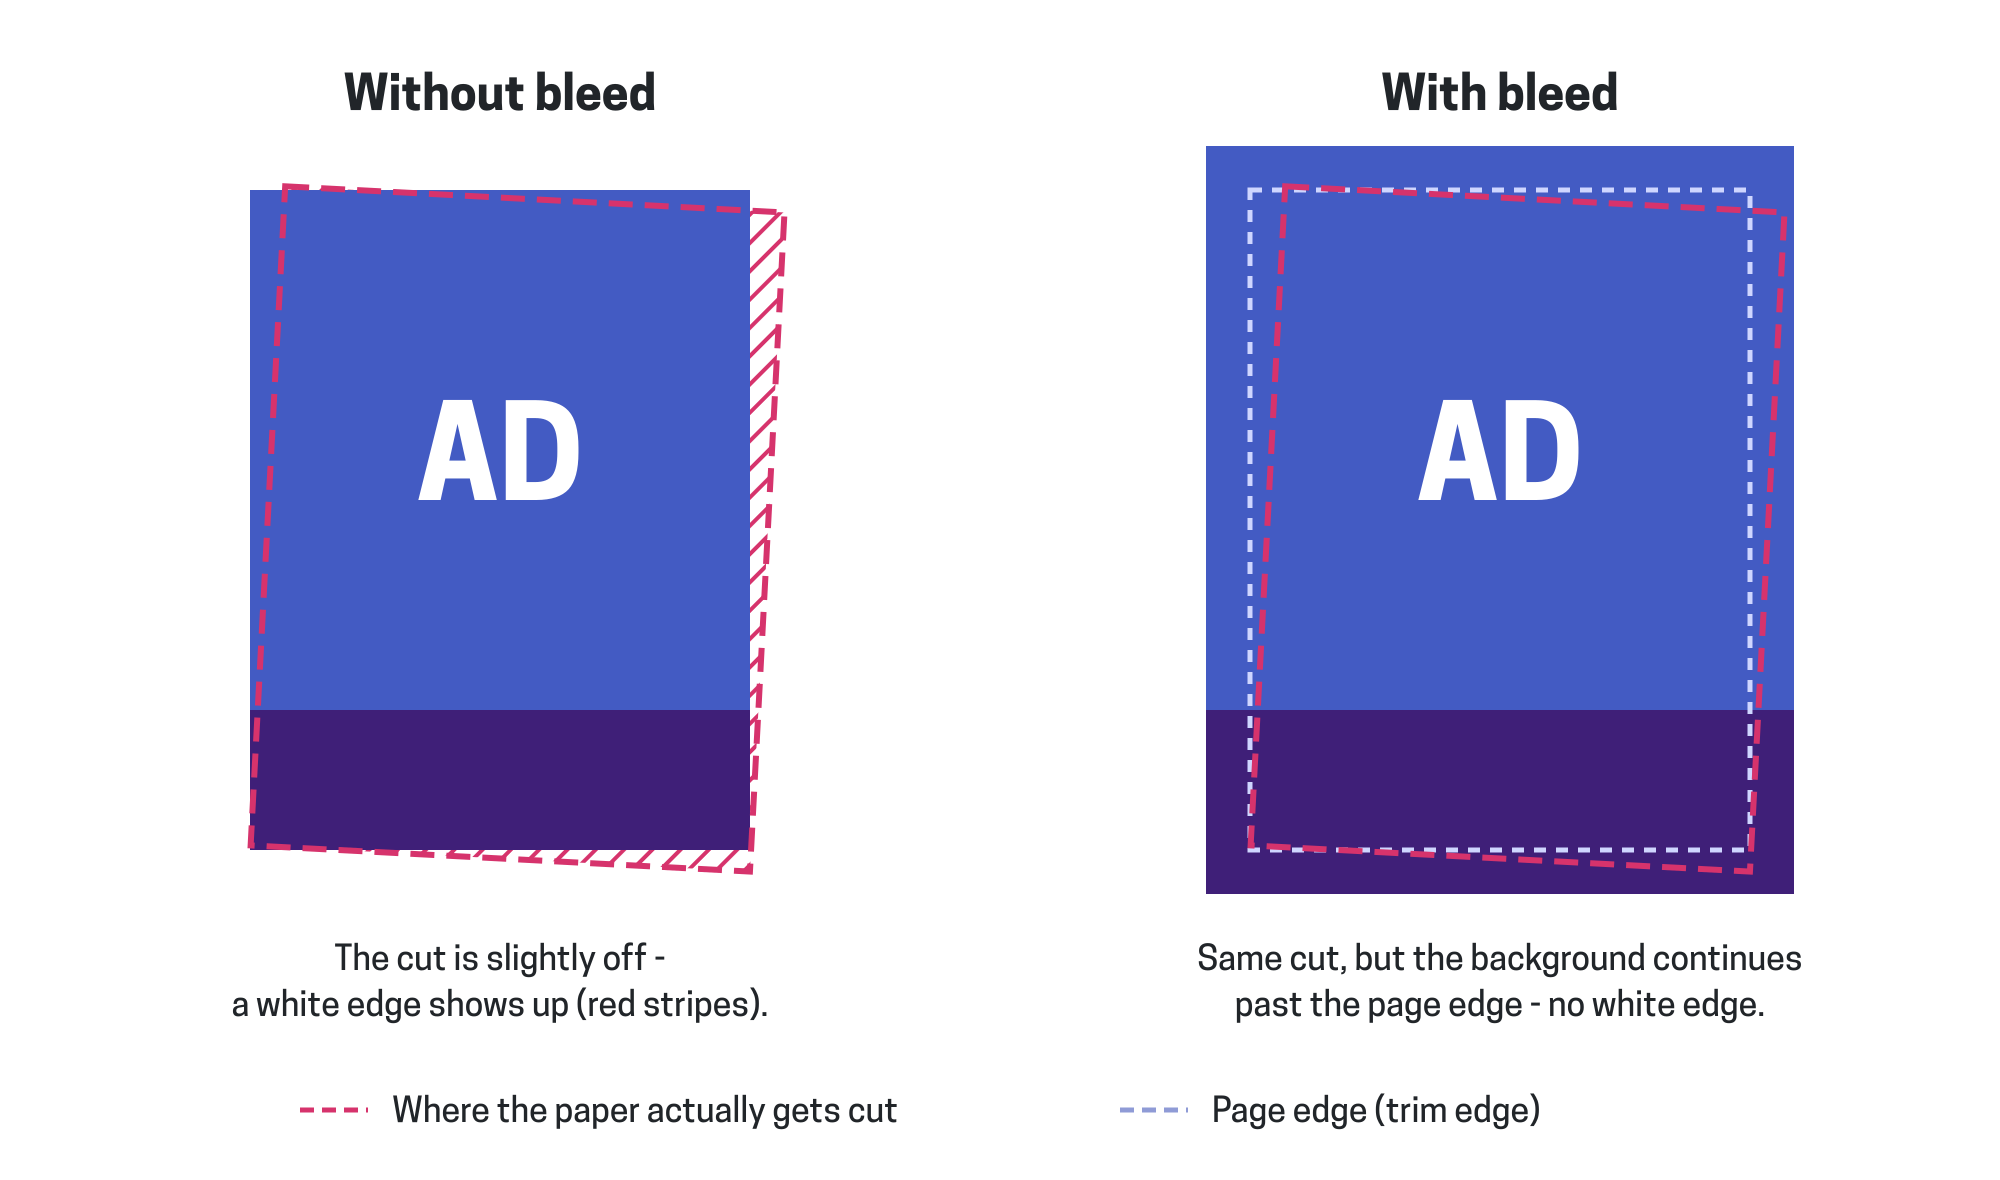
- Add a 5 mm bleed on each side. Your file is an A4 page plus 5 mm on every side (220 × 307 mm). Extend your background - and any decorations that touch the edge of the page - into the bleed, but put nothing else there. What's a bleed?
- Leave room for the header. We add the "Sponsorship Advertisement" header on top of your ad, over the top 9 mm of the page. It covers anything underneath it, so don't put anything important there - and don't add the header yourself.
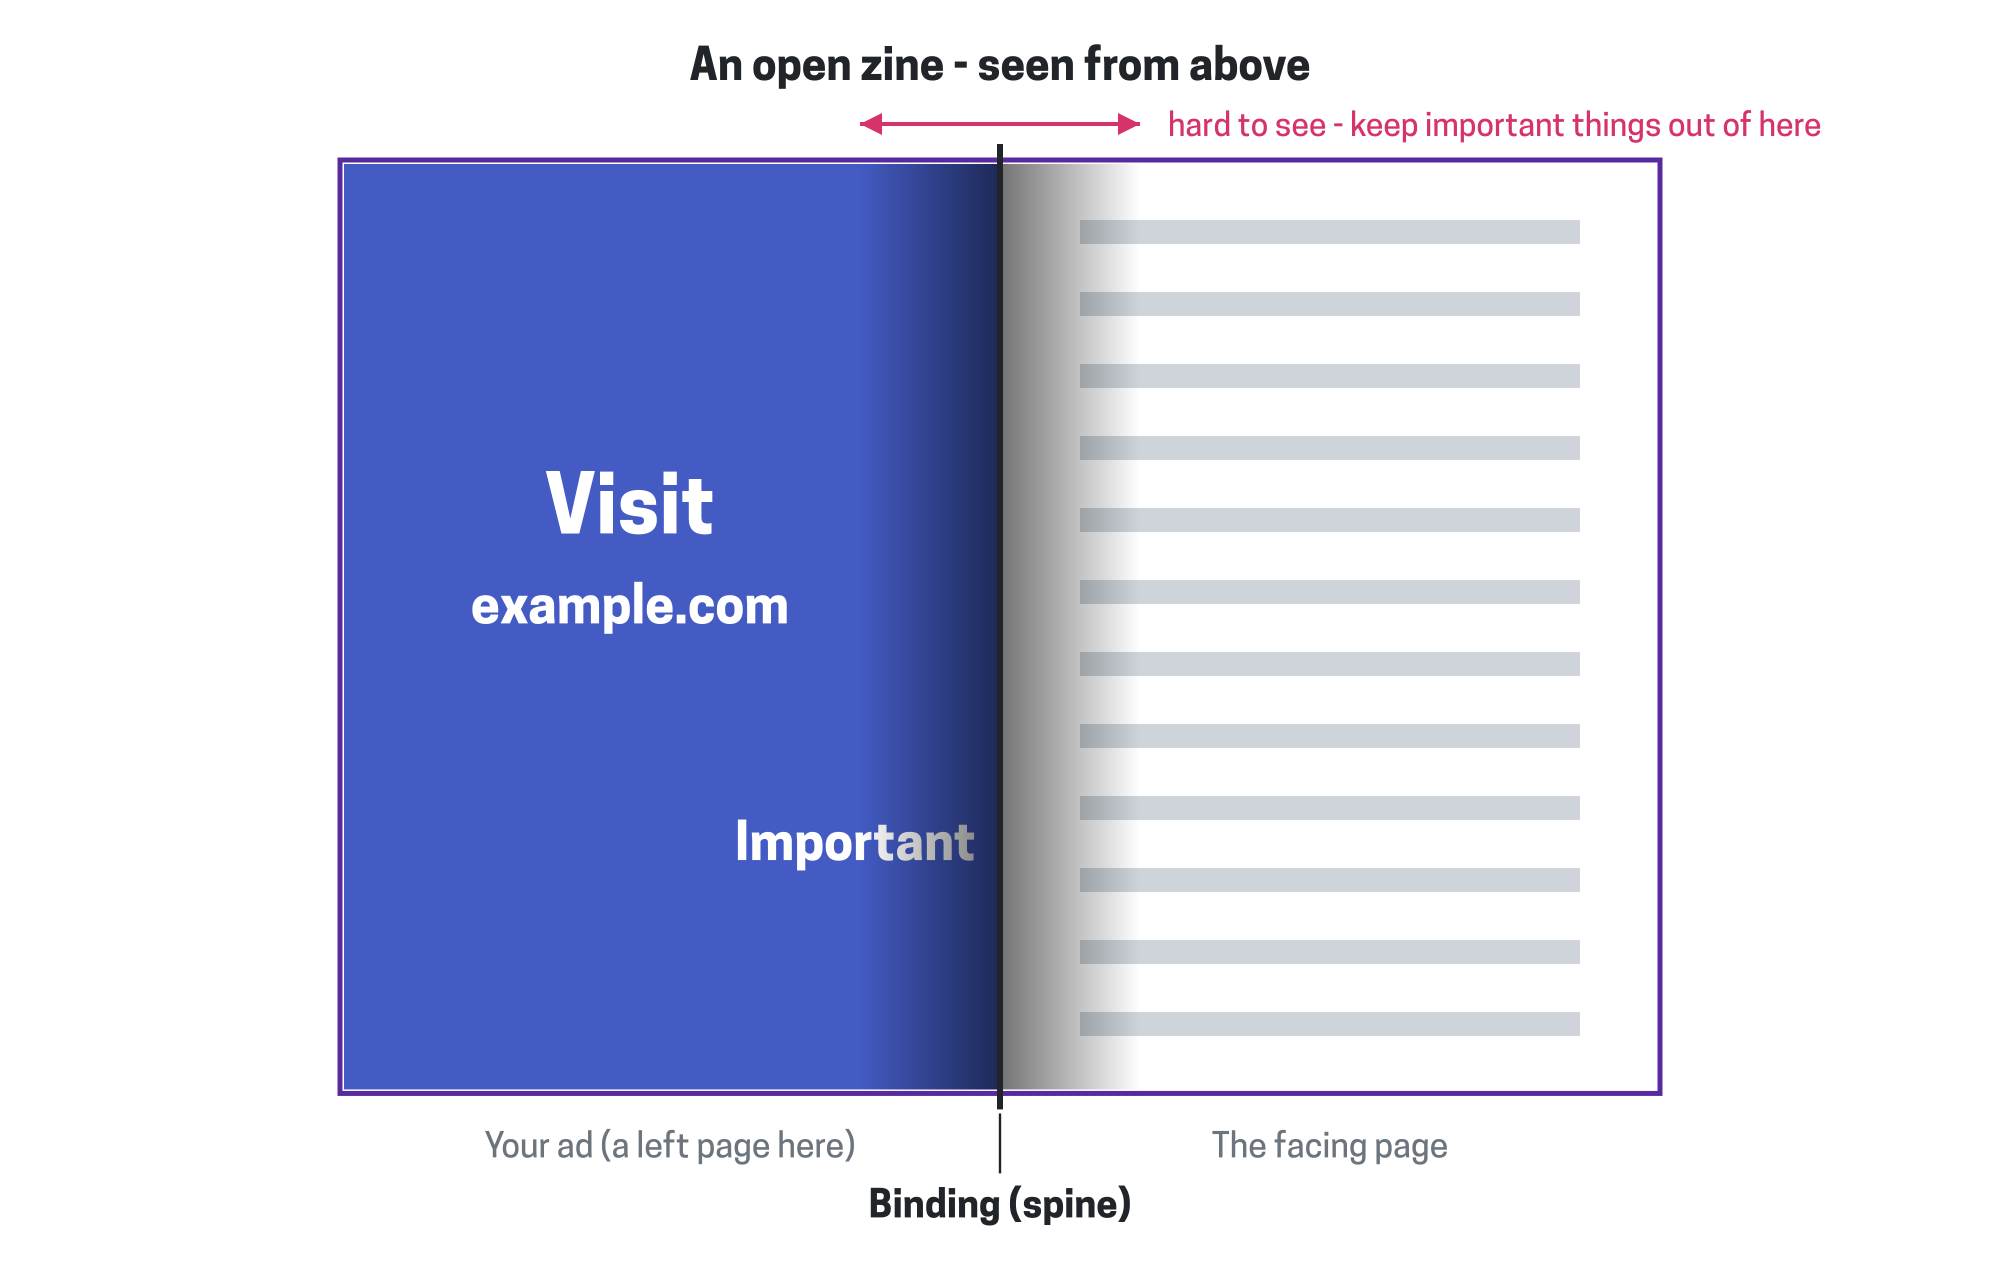
- Keep important content inside the content area. Keep text, logos, QR codes, and other important things at least 10 mm from the top and bottom, and 18 mm from the left and right edges of the A4 page. These safe margins should contain only background or decorations. The left and right margins are wider because of the binding - and since your ad can end up on either a left or a right page, they're the same on both sides.
Click to enlarge
| What | mm | inches | points | pixels* (300 DPI) |
Remarks | |
|---|---|---|---|---|---|---|
| A | File width | 220 | 8.66 | 623.62 | 2598 | The width of your file (PDF page or PNG image), including the bleed: C + 2 × E. |
| B | File height | 307 | 12.09 | 870.24 | 3626 | The height of your file, including the bleed: D + 2 × E. |
| C | Page width (A4) | 210 | 8.27 | 595.28 | 2480 | The final width of the page after cutting. The trim edge is E away from the left and right edges of your file. |
| D | Page height (A4) | 297 | 11.69 | 841.89 | 3508 | The final height of the page after cutting. The trim edge is E away from the top and bottom edges of your file. |
| E | Bleed | 5 | 0.20 | 14.17 | 59 | On every side, measured from the trim edge outwards. Only background and decorations that touch the page edge go here. |
| F | Header | 9 | 0.35 | 25.51 | 106 | Measured from the top trim edge down, so it covers the top 14 mm of your file. Added by us - don't add it yourself. |
| G | Top and bottom safe margin | 10 | 0.39 | 28.35 | 118 | Measured from the top and bottom trim edges inwards (15 mm from the top and bottom edges of your file). Background or decorations only. The header (F) fits inside the top one. |
| H | Left and right safe margin | 18 | 0.71 | 51.02 | 213 | Measured from the left and right trim edges inwards (23 mm from the left and right edges of your file). Background or decorations only. Wider because of the binding. |
| I | Content area width | 174 | 6.85 | 493.23 | 2055 | C - 2 × H. All important content goes inside the content area. |
| J | Content area height | 277 | 10.91 | 785.20 | 3272 | D - 2 × G. All important content goes inside the content area. |
* Pixel sizes are rounded to whole pixels. Make your file exactly A × B pixels. The other values may not add up to exactly the same numbers - but being a pixel off doesn't matter: at 300 DPI, one pixel is just 0.085 mm (0.0033 in), so no one will notice the difference.
Typical problems
Not all of these problems are critical, but each of them can lower the quality of your ad - so they're worth checking before you send it to us.
Most problems we see are with full-page ads, and they're all about the edges of the page. Half-page ads don't reach the edges of the paper, so they don't have these problems.
- Text or logos in the safe margin. Anything important closer than 10 mm to the top or bottom edge, or 18 mm to the left or right edge of the page, might be cut off, covered by the header, or hidden in the binding. Move it into the content area.
- Text or logos in the bleed. The bleed gets cut off - only background belongs there.
- Background that stops at the page edge. If your background, a photo, or a decorative shape touches the edge of the A4 page, it has to continue 5 mm into the bleed - otherwise a thin white edge can appear after cutting.
- A file without the bleed. A 210 × 297 mm file is missing the bleed - the correct size is 220 × 307 mm. Please extend the design rather than scaling it up, as scaling would move content into the margins.
- Important content under the header. The top 9 mm of the page will be covered by the header.
- A header in the design. We add the header ourselves - please don't include it in your ad.
- A 10 mm margin on the left and right. On the sides, the safe margin is 18 mm because of the binding.
And a few file problems that can happen with any ad:
- CMYK colors instead of RGB.
- Text converted to curves or outlines instead of being kept as text.
- Links that aren't clickable in a PDF - or no QR code or visible address for readers of a printed copy.
- Low-resolution or heavily compressed images - use 300 DPI.
- A PDF that opens slowly - see the loading speed tip in Ad file formats.
- Printer's marks in the PDF - crop marks, registration marks, color bars, and the like make the page bigger than the ad and would end up visible in the zine. Please export without them.
Glossary
- Trim edge
- The edge of the page after the printed paper is cut to its final size. For Paged Out!, that's an A4 page (210 × 297 mm).
- Bleed
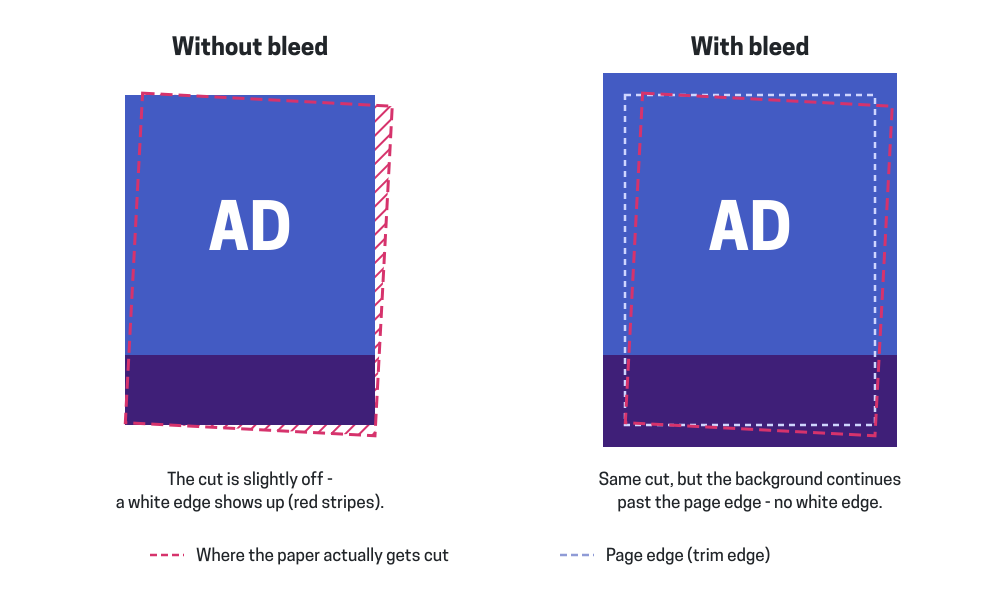
- Extra space around the page, beyond the trim edge (5 mm on each side for
full-page ads). When printed pages are cut, the cutting machine is never perfectly precise - the cut can
be slightly rotated, or the paper can move a little. The bleed makes sure that even then the background
still reaches the edge of the paper, instead of ending in a thin white line. Only put the continuation
of your background (and of decorations touching the page edge) there.
- Printer's marks
- Lines and symbols that design tools can add around the page when exporting a PDF for printing: crop marks (also called trim marks) that show where to cut, bleed marks, registration marks (small targets used to align the colors), color bars, and page information (file name, date, etc.). They're placed outside the page, in an extra area called the slug. Please don't add any of them to your ad - we only need the ad itself (with the bleed, for full-page ads).
- Safe margin
- A strip along the edges of the page, inside the trim edge, where nothing important should be placed - only background or decorations. Things there might be cut off, covered by the header, or hidden in the binding.
- Binding (spine)
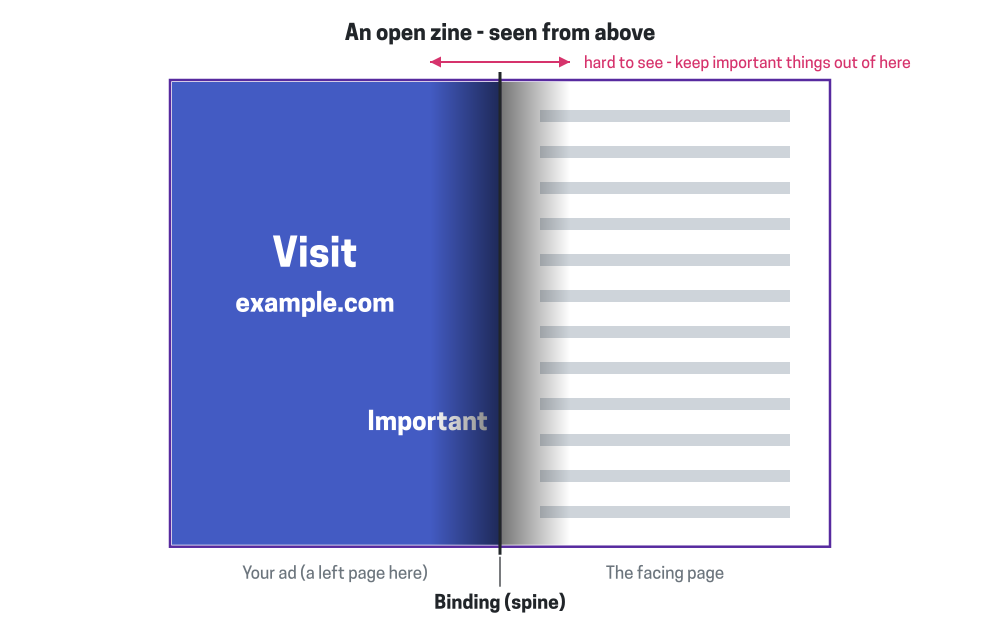
- The side where the pages of the zine are held together. Depending on how the zine is bound, the part
of the page close to the binding may not open fully - and many readers don't want to break the spine of
their zine to see it. That's why the safe margin is wider on the sides
(18 mm). Your ad can end up on either a left or a right page, so
the same margin applies on both sides.
- Content area
- The part of the page inside the safe margins - this is where all the important content goes (text, logos, QR codes, etc.).
- Header
- The "Community Advertisement" or "Sponsorship Advertisement" bar that we add to every ad. On half-page ads it's placed above your ad; on full-page ads it covers the top 9 mm of the page. We suggest keeping important content a bit further away from the header than strictly needed - a little breathing room below it makes the whole design look better.
- DPI (dots per inch)
- How many pixels make up one inch (25.4 mm) of a printed image. We use 300 DPI, which is about 11.8 pixels per millimeter.
- RGB and CMYK
- Two ways of describing colors. Screens use RGB (red, green, and blue light), while printers use CMYK (cyan, magenta, yellow, and black ink). Since most readers see Paged Out! on a screen, please send your ad in RGB.
- Text as text (vs. outlines)
- Design tools can export text either as real text or converted into shapes (often called "outlines" or "curves"). Please keep text as real text - it stays sharp, can be searched and copied, and keeps the file small. Converting is fine for things like logos, where it's intended.
- Clickable link (link annotation)
- A clickable area in a PDF that opens a web address. Many design tools add these automatically when you put a hyperlink in your design and export it to PDF.
Have questions?
Don't hesitate to contact us at ads@pagedout.institute - we're happy to help!